
Pinstripe/Display

You are encouraged to solve this task according to the task description, using any language you may know.

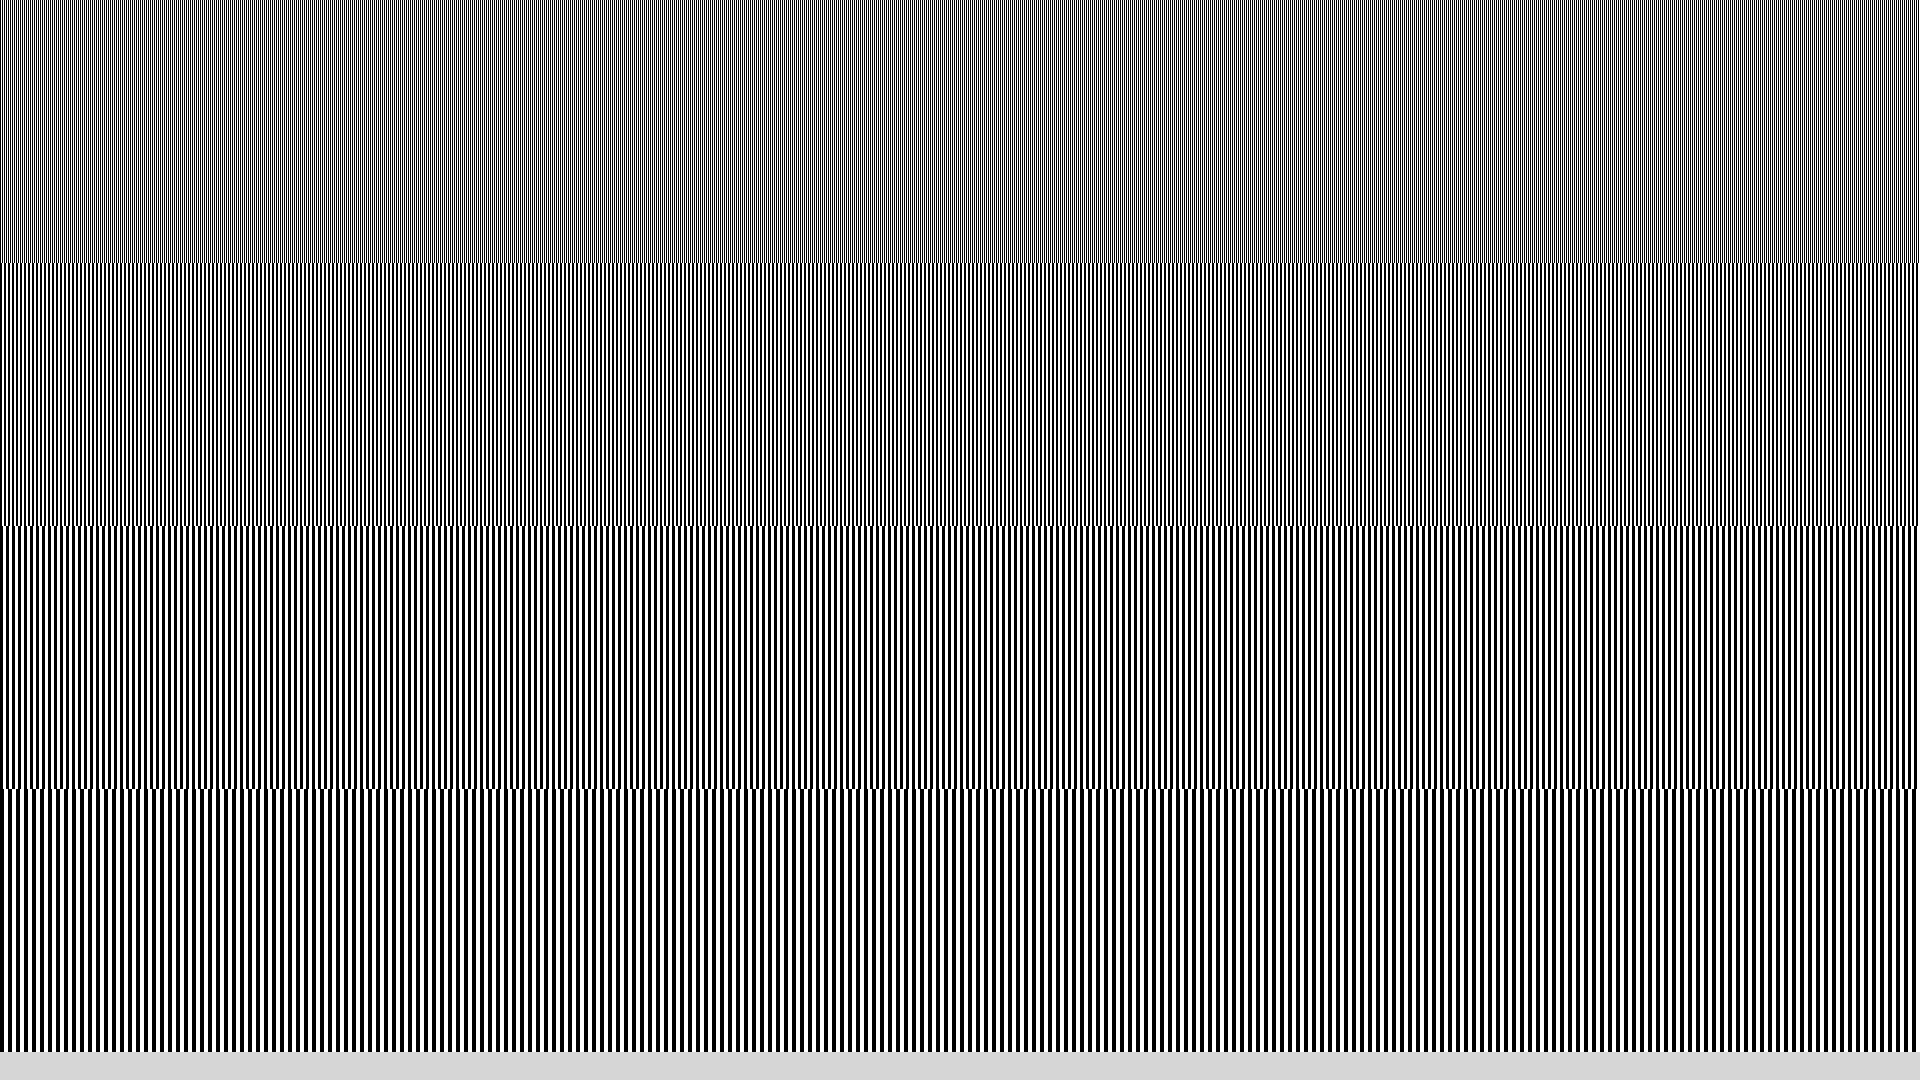
The task is to demonstrate the creation of a series of vertical pinstripes across the entire width of the display.
- in the first quarter the pinstripes should alternate one pixel white, one pixel black = 1 pixel wide vertical pinestripes
- Quarter of the way down the display, we can switch to a wider 2 pixel wide vertical pinstripe pattern, alternating two pixels white, two pixels black.
- Half way down the display, we switch to 3 pixels wide,
- for the lower quarter of the display we use 4 pixels.
6502 Assembly
This is very similar to the color pinstripe task. It actually takes more code to execute, though not by much. Output can be viewed by copying this source code, then clicking "Assemble" then "Run."
define color $00
define looptemp $01
lda #1
sta color

loop_1wide:
lda color
and #$01
; this takes advantage of the fact that Easy6502 maps black to 0 and white to 1.
; Thus if we clear all but bit 0 the color will be either black or white, alternating infinitely regardless of the actual value
; of the color variable.

sta $0200,x
inc color
inx
bne loop_1wide

loop_2wide:
lda color
and #$01
sta $0300,x
inx
sta $0300,x
inc color
inx
bne loop_2wide

lda #1
sta color
lda #0
tax
tay
sta looptemp  ;reset regs

loop_3wide:
lda color
and #$01
sta $0400,x
inc looptemp
inx

sta $0400,x
inc looptemp
inx

sta $0400,x
inc looptemp
inc color
inx

lda looptemp
cmp #$1e
bne loop_3wide

lda color    ;loop overhead
and #$01
sta $0400,x  ;can't fit all of this stripe.
	     ;two columns will have to do.
inx
lda color
and #$01
sta $0400,x
inx

lda #1
sta color
lda #0
sta looptemp  ;reset color and looptemp
iny
cpy #$08      ;check secondary loop counter
bne loop_3wide

lda #1
sta color
lda #0
tax
tay
sta looptemp

loop_4wide:
lda color
and #$01
sta $0500,x
inx
inc looptemp

sta $0500,x
inx
inc looptemp

sta $0500,x
inx
inc looptemp

sta $0500,x
inc color
inc looptemp
inx

lda looptemp
cmp #$20
bne loop_4wide
lda #0
sta looptemp
lda #1
sta color

iny
cpy #$8
bcc loop_4wide

brk        ;program end
8086 Assembly
	;;; Display pinstripes on a PC, using 8086 assembly.
	;;; The 640x200 CGA video mode is used. If you are on an MDA, the
	;;; program does not run.
	bits	16
	cpu	8086
	;;; IBM BIOS (INT 10h) calls
vmode:	equ	0Fh	; Get current video mode
	;;; Video modes
MDATXT:	equ	7	; MDA text mode (to check current mode against)
CGAHI:	equ	6	; CGA "high resolution" mode (640x200)
	;;; Video memory
M_EVEN:	equ	0B800h	; Video memory segment for even scanlines
M_ODD:	equ	0BA00h	; Video memory segment for odd scanlines
section .text
	org	100h
	cld			; Make sure string instructions go forward
	mov	ah,vmode	; Get current video mode
	int	10h
	cmp	al,MDATXT	; Are we in MDA text mode?
	jne	gr_ok
	ret			; Then stop (no graphics support)
gr_ok:	mov	[oldmod],al	; otherwise, store old graphics mode,
	mov	ax,CGAHI 	; and switch to hi-res CGA mode
	int	10h
	;;;	There are 200 lines on the screen, but even and odd scanlines
	;;;	are stored separately. Because we're drawing vertical lines
	;;;	at a quarter of the screen, every odd scanline matches the
	;;;	even one before it. This means we really only need 100 lines,
	;;;	which means a quarter of the screen is 25 lines. There are
	;;;	640 pixels per line, so each quarter consists of 16.000 pixels,
	;;;	or 2000 bytes, or 1000 words.
	mov	bp,1000		; Keep a '1000' constant loaded
	mov	ax,M_EVEN	; Start with the even scan lines
	mov	dl,2		; Let DL = 2 (we are doing the loop twice)
screen:	mov	es,ax		; Let ES be the video segment
	xor	di,di		; Start at the beginning
	mov	si,one		; Starting with pattern one
	lodsw
	mov	cx,bp		; Write 1000 words of pattern one
	rep	stosw
	lodsw
	mov	cx,bp		; Write 1000 words of pattern two
	rep	stosw
	lodsb			; Pattern three is more complicated
	xchg	al,bl 		; Let BL be the 3rd byte,
	lodsw			; and AX be the first two.
	mov	bh,25		; We need to write 25 lines,
quart3:	mov	cx,26		; and every line we need to write 26*3 bytes
line3:	stosw
	xchg	al,bl
	stosb
	xchg	al,bl
	loop	line3
	stosw			; Plus two final bytes per line
	dec	bh
	jnz	quart3
	lodsw			; Finally, write 1000 words of pattern four
	mov	cx,bp
	rep	stosw
	mov	ax,M_ODD	; Then, do the odd scanlines
	dec	dl		; If we haven't already done them
	jnz	screen
	;;;	We are now done. Wait for a key, restore the old video mode,
	;;;	and exit.
	xor	ah,ah		; Wait for a key
	int	16h
	xor	ah,ah		; Restore the old video mode
	mov	al,[oldmod]
	int	10h
	ret			; And exit
section	.data
	;;; Pattern data
one:	dw	0AAAAh	; one on, one off pattern
two:	dw	0CCCCh	; two on, two off pattern
three:	db	38h	; three isn't divisible by 16
	dw	8EE3h	; we need 24 bits for the pattern to repeat
four:	dw	0F0F0h	; four on, four off pattern
section	.bss
oldmod:	resb	1	; place to keep old video mode, in order to
			; restore it.
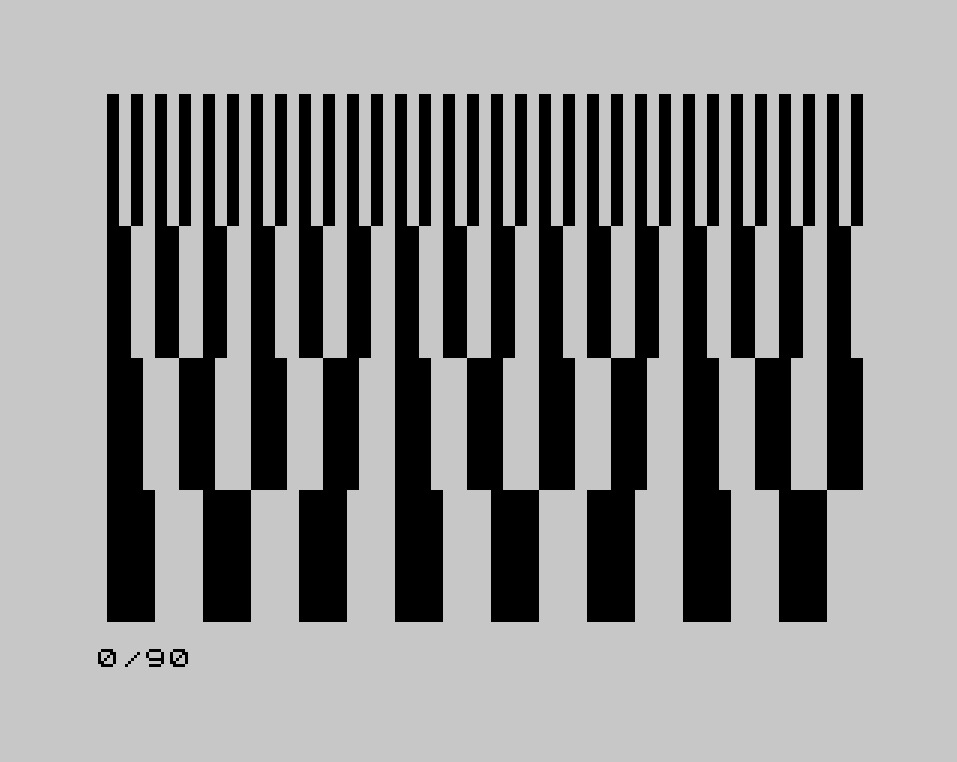
Action!
PROC Main()
  BYTE
    CH=$02FC, ;Internal hardware value for last key pressed
    COLOR0=$02C4,COLOR1=$02C5,COLOR2=$02C6,COLOR4=$02C8
  CARD i

  Graphics(8+16)
  COLOR4=$04 ;gray
  COLOR1=$00 ;black
  COLOR2=$0F ;white

  FOR i=0 TO 319
  DO
    Color=i MOD 2
    Plot(i,0) DrawTo(i,47)

    Color=i/2 MOD 2
    Plot(i,48) DrawTo(i,95)

    Color=i/3 MOD 2
    Plot(i,96) DrawTo(i,143)

    Color=i/4 MOD 2
    Plot(i,144) DrawTo(i,191)
  OD

  DO UNTIL CH#$FF OD
  CH=$FF
RETURN- Output:
Screenshot from Atari 8-bit computer
ActionScript
package  {

    import flash.display.Bitmap;
    import flash.display.BitmapData;
    import flash.display.Sprite;
    import flash.events.Event;

    public class Pinstripe extends Sprite {

        public function Pinstripe():void {
            if (stage) init();
            else addEventListener(Event.ADDED_TO_STAGE, init);
        }

        private function init(e:Event = null):void {

            var data:BitmapData = new BitmapData(stage.stageWidth, stage.stageHeight, false, 0xFFFFFFFF);
            data.lock();

            var w:uint = data.width, h:uint = data.height / 4;
            var x:uint, y:uint = 0, i:uint, px:uint, colour:uint, maxy:uint = h;

            for ( i = 1; i <= 4; i++ ) {

                for ( ; y < maxy; y++ ) {
                    colour = 0xFF000000;
                    px = 1;

                    for ( x = 0; x < w; x++ ) {

                        if ( px == i ) {
                            colour = (colour == 0xFF000000) ? 0xFFFFFFFF : 0xFF000000;
                            px = 1;
                        }
                        else px++;

                        data.setPixel32(x, y, colour);

                    }
                }

                maxy += h;

            }

            data.unlock();
            addChild(new Bitmap(data));
        }

    }

}
Ada
with SDL.Video.Windows.Makers;
with SDL.Video.Renderers.Makers;
with SDL.Events.Events;

procedure Pinstripe_Display is

   Width   : constant := 800;
   Height  : constant := 400;

   Window   : SDL.Video.Windows.Window;
   Renderer : SDL.Video.Renderers.Renderer;
   Event    : SDL.Events.Events.Events;

   use SDL;
   use type SDL.C.int;

   procedure Draw_Pinstripe (Line_Width   : in C.int;
                             Line_Height  : in C.int;
                             Screen_Width : in C.int;
                             Y            : in C.int)
   is
      Count : constant C.int := Screen_Width / (2 * Line_Width);
   begin
      Renderer.Set_Draw_Colour (Colour => (255, 255, 255, 255));
      for A in 0 .. Count loop
         Renderer.Fill (Rectangle => (X => 2 * A * Line_Width, Y => Y,
                                      Width  => Line_Width,
                                      Height => Line_Height));
      end loop;
   end Draw_Pinstripe;

   procedure Wait is
      use type SDL.Events.Event_Types;
   begin
      loop
         while SDL.Events.Events.Poll (Event) loop
            if Event.Common.Event_Type = SDL.Events.Quit then
               return;
            end if;
         end loop;
         delay 0.100;
      end loop;
   end Wait;

begin
   if not SDL.Initialise (Flags => SDL.Enable_Screen) then
      return;
   end if;

   SDL.Video.Windows.Makers.Create (Win      => Window,
                                    Title    => "Pinstripe",
                                    Position => SDL.Natural_Coordinates'(X => 10, Y => 10),
                                    Size     => SDL.Positive_Sizes'(Width, Height),
                                    Flags    => 0);
   SDL.Video.Renderers.Makers.Create (Renderer, Window.Get_Surface);
   Renderer.Set_Draw_Colour ((0, 0, 0, 255));
   Renderer.Fill (Rectangle => (0, 0, Width, Height));

   Draw_Pinstripe (1, Height / 4, Width, 0);
   Draw_Pinstripe (2, Height / 4, Width, 100);
   Draw_Pinstripe (3, Height / 4, Width, 200);
   Draw_Pinstripe (4, Height / 4, Width, 300);
   Window.Update_Surface;

   Wait;
   Window.Finalize;
   SDL.Finalise;
end Pinstripe_Display;
AutoHotkey
Requires the GDI+ standard library: http://www.autohotkey.com/forum/viewtopic.php?t=32238
It is worth noting that this fills the whole screen; press Esc to exit.
h	:= A_ScreenHeight
w	:= A_ScreenWidth
pToken	:= Gdip_Startup()
hdc	:= CreateCompatibleDC()
hbm	:= CreateDIBSection(w, h)
obm	:= SelectObject(hdc, hbm)
G	:= Gdip_GraphicsFromHDC(hdc)

OnExit, Exit

Gui -Caption +E0x80000 +LastFound +OwnDialogs +Owner +AlwaysOnTop
Gui Show, NA
hwnd	:= WinExist()

pBrushB := Gdip_BrushCreateSolid(0xFF000000)
pBrushW := Gdip_BrushCreateSolid(0xFFFFFFFF)
Loop 4
{
	n := A_Index
	Loop % w
		BorW := A_Index & 1 ? "B" : "W"
		,Gdip_FillRectangle(G, pBrush%BorW%
				    , A_Index*n-n, (n-1)*h/4, n, h/4)
}

UpdateLayeredWindow(hwnd, hdc, 0, 0, W, H)

Gdip_DeleteBrush(pBrushB)
Gdip_DeleteBrush(pBrushW)

SelectObject(hdc, obm)
DeleteObject(hbm)
DeleteDC(hdc)
Gdip_DeleteGraphics(G)
Return

Escape::
Exit:
Gdip_Shutdown(pToken)
ExitApp
BBC BASIC
      GWL_STYLE = -16
      HWND_TOPMOST = -1
      WS_VISIBLE = &10000000
      WS_CLIPCHILDREN = &2000000
      WS_CLIPSIBLINGS = &4000000

      SYS "GetSystemMetrics", 0 TO xscreen%
      SYS "GetSystemMetrics", 1 TO yscreen%
      SYS "SetWindowLong", @hwnd%, GWL_STYLE, WS_VISIBLE + \
      \                    WS_CLIPCHILDREN + WS_CLIPSIBLINGS
      SYS "SetWindowPos", @hwnd%, HWND_TOPMOST, 0, 0, xscreen%, yscreen%, 0
      VDU 26

      FOR X% = 0 TO xscreen%*4-4 STEP 4
        RECTANGLE FILL X%,yscreen%*3/2,2,yscreen%/2
      NEXT
      FOR X% = 0 TO xscreen%*4-8 STEP 8
        RECTANGLE FILL X%,yscreen%*2/2,4,yscreen%/2
      NEXT
      FOR X% = 0 TO xscreen%*4-12 STEP 12
        RECTANGLE FILL X%,yscreen%*1/2,6,yscreen%/2
      NEXT
      FOR X% = 0 TO xscreen%*4-16 STEP 16
        RECTANGLE FILL X%,yscreen%*0/2,8,yscreen%/2
      NEXT
Befunge
This is loosely based on the C# sample, only it writes the image to stdout using the PBM format. You can either redirect that to a file, or pipe it to something like ImageMagick's display utility to view the result.
The dimensions of the image are specified by the first two values on the stack: 1366 ("%":*3-) by 768 ("`"8*).
"%":*3-"`"8*>4/::8%00p8/10p4*\55+"1P",,v
,:.\.5vv-g025:\-1_$$55+,\:v1+*8g01g00_@>
024,+5<>/2%.1+\:>^<:\0:\-1_$20g1-:20p^1p
C
This code is only a slight variation of my Colour Pinstripe C code. It also uses Borland's Turbo C graphics library.
#include<graphics.h>
#include<conio.h>

#define sections 4

int main()
{
	int d=DETECT,m,maxX,maxY,x,y,increment=1;
	initgraph(&d,&m,"c:/turboc3/bgi");

	maxX = getmaxx();
	maxY = getmaxy();

	for(y=0;y<maxY;y+=maxY/sections)
	{
		for(x=0;x<maxX;x+=increment)
		{
			setfillstyle(SOLID_FILL,(x/increment)%2==0?BLACK:WHITE); //The only line which differs
			bar(x,y,x+increment,y+maxY/sections);
		}
		increment++;
	}

	getch();
	closegraph();
	return 0;
}
C#
Using System.Drawing, and writing the output to a file.
using System.Drawing;

public class Pinstripe
{
    static void Main(string[] args)
    {
        var pinstripe = MakePinstripeImage(1366, 768);
        pinstripe.Save("pinstripe.png");
    }

    public static Bitmap MakePinstripeImage(int width, int height)
    {
        var image = new Bitmap(width, height);
        var quarterHeight = height / 4;

        for (var y = 0; y < height; y++)
        {
            var stripeWidth = (y / quarterHeight) + 1;

            for (var x = 0; x < width; x++)
            {
                var color = ((x / stripeWidth) % 2) == 0 ? Color.White : Color.Black;
                image.SetPixel(x, y, color);
            }
        }

        return image;
    }
}
C++

#include <windows.h>

//--------------------------------------------------------------------------------------------------
class pinstripe
{
public:
    pinstripe()                        { createColors(); }
    void setDimensions( int x, int y ) { _mw = x; _mh = y; }
    void createColors()
    {
	colors[0] = 0; colors[1] = RGB( 255, 255, 255 );
    }

    void draw( HDC dc )
    {
        HPEN pen;
	int lh = _mh / 4, row, cp;
	for( int lw = 1; lw < 5; lw++ )
	{
	    cp = 0;
            row = ( lw - 1 ) * lh;
	    for( int x = 0 + lw > 1 ? lw > 3 ? 2 : 1 : 0; x < _mw; x += lw )
	    {
		pen = CreatePen( PS_SOLID, lw, colors[cp] );
	        ++cp %= 2;

		SelectObject( dc, pen );
		MoveToEx( dc, x, row, NULL );
		LineTo( dc, x, row + lh );
		DeleteObject( pen );
	    }
	}
    }

private:
    int _mw, _mh;
    DWORD colors[2];
};
//--------------------------------------------------------------------------------------------------
pinstripe pin;

//--------------------------------------------------------------------------------------------------
void PaintWnd( HWND hWnd )
{
    PAINTSTRUCT ps;
    HDC hdc = BeginPaint( hWnd, &ps );
    pin.draw( hdc );
    EndPaint( hWnd, &ps );
}
//--------------------------------------------------------------------------------------------------
LRESULT CALLBACK WndProc( HWND hWnd, UINT msg, WPARAM wParam, LPARAM lParam )
{
    switch( msg )
    {
	case WM_DESTROY: PostQuitMessage( 0 ); break;
	case WM_PAINT: PaintWnd( hWnd ); break;
	default:
	    return DefWindowProc( hWnd, msg, wParam, lParam );
    }
    return 0;
}
//--------------------------------------------------------------------------------------------------
HWND InitAll( HINSTANCE hInstance )
{
    WNDCLASSEX wcex;
    ZeroMemory( &wcex, sizeof( wcex ) );

    wcex.cbSize	       = sizeof( WNDCLASSEX );
    wcex.style	       = CS_HREDRAW | CS_VREDRAW;
    wcex.lpfnWndProc   = WndProc;
    wcex.hInstance     = hInstance;
    wcex.hCursor       = LoadCursor( NULL, IDC_ARROW );
    wcex.hbrBackground = ( HBRUSH )( COLOR_WINDOW + 1 );
    wcex.lpszClassName = "_BW_PS_";

    RegisterClassEx( &wcex );
    return CreateWindow( "_BW_PS_", ".: Pinstripe -- PJorente :.", WS_POPUP, CW_USEDEFAULT, 0, 200, 200, NULL, NULL, hInstance, NULL );
}
//--------------------------------------------------------------------------------------------------
int APIENTRY _tWinMain( HINSTANCE hInstance, HINSTANCE hPrevInstance, LPTSTR lpCmdLine, int nCmdShow )
{
    srand( GetTickCount() );

    HWND hwnd = InitAll( hInstance );
    if( !hwnd ) return -1;

    int mw = GetSystemMetrics( SM_CXSCREEN ),
	mh = GetSystemMetrics( SM_CYSCREEN );

    pin.setDimensions( mw, mh );

    RECT rc = { 0, 0, mw, mh };

    AdjustWindowRectEx( &rc, WS_POPUP, FALSE, 0 );
    int w = rc.right  - rc.left,
	h = rc.bottom - rc.top;

    int posX = ( GetSystemMetrics( SM_CXSCREEN ) >> 1 ) - ( w >> 1 ),
	posY = ( GetSystemMetrics( SM_CYSCREEN ) >> 1 ) - ( h >> 1 );

    SetWindowPos( hwnd, HWND_TOP, posX, posY, w, h, SWP_NOZORDER );
    ShowWindow( hwnd, nCmdShow );
    UpdateWindow( hwnd );

    MSG msg;
    ZeroMemory( &msg, sizeof( msg ) );
    while( msg.message != WM_QUIT )
    {
	if( PeekMessage( &msg, NULL, 0, 0, PM_REMOVE ) != 0 )
	{
	    TranslateMessage( &msg );
	    DispatchMessage( &msg );
	}
    }
    return UnregisterClass( "_BW_PS_", hInstance );
}
//--------------------------------------------------------------------------------------------------
Delphi
procedure DrawVerticalStripes(Image: TImage; PenWidth,Top,Bottom: integer);
{Draw vertical stripes across full width of image}
{Top/Bottom Control the position of the band of stripes}
{PenWidth controls width of the line drawn}
var X,X2,Y: integer;
begin
Image.Canvas.Pen.Width:=PenWidth;
for X:=0 to (Image.Width div PenWidth)-1 do
	begin
	if (X mod 2)=0 then Image.Canvas.Pen.Color:=clWhite
	else Image.Canvas.Pen.Color:=clBlack;
	X2:=X * PenWidth;
	Image.Canvas.MoveTo(X2,Top);
	Image.Canvas.LineTo(X2,Bottom);
	end;
end;

procedure ShowVerticalStripes(Image: TImage);
{Draw all four bands of stripes}
var SHeight: integer;
var I: integer;
begin
SHeight:=Image.Height div 4;
for I:=0 to 4-1 do
	begin
	DrawVerticalStripes(Image,I+1,SHeight*I,SHeight*(I+1));
	end;
end;
- Output:

Elapsed Time: 26.113 ms.
FreeBASIC
' version 14-03-2017
'    compile with: fbc -s console
' or compile with: fbc -s gui

Dim As UInteger ps, col, h, w, x, y1, y2
ScreenInfo w, h

' create display size window, 8bit color (palette), no frame
ScreenRes w, h, 8,, 8
' vga palette black = 0 and white = 15

h = h \ 4 : y2 = h -1

For ps = 1 To 4
    col = 0
    For x = 0 To (w - ps -1) Step ps
        Line (x, y1) - (x + ps -1, y2), col, bf
        col = 15 - col ' col alternate between 0 (black) and 15 (white)
    Next
    y1 += h : y2 += h
Next

' empty keyboard buffer
While InKey <> "" : Wend
'Print : Print "hit any key to end program"
Sleep
End
Gambas
'WARNING this takes a time to display
'Use the 'gb.qt4' component

Public Sub Form_Open()
Dim iColour As Integer[] = [Color.Black, Color.white]
Dim hPanel As Panel
Dim siCount, siCounter, siSet As Short

With Me
  .Arrangement = Arrange.Row
  .Border = False
  .Height = Desktop.Height
  .Width = Desktop.Width
  .Fullscreen = True
End With

For siCounter = 1 To 4
  For siCount = 1 To Desktop.Width Step siCounter
    hpanel = New Panel(Me)
    hpanel.Width = siCounter
    hpanel.Height = Desktop.Height / 4
    HPanel.Background = iColour[siSet]
    Inc siSet
    If siSet > 1 Then siSet = 0
  Next
Next

End
Click here for an image of the output
Go
The code here is the same as that for the Color pinstripe task except that the palette is limited to the two colors, white and black.
package main

import "github.com/fogleman/gg"

var palette = [2]string{
    "FFFFFF", // white
    "000000", // black
}

func pinstripe(dc *gg.Context) {
    w := dc.Width()
    h := dc.Height() / 4
    for b := 1; b <= 4; b++ {
        for x, ci := 0, 0; x < w; x, ci = x+b, ci+1 {
            dc.SetHexColor(palette[ci%2])
            y := h * (b - 1)
            dc.DrawRectangle(float64(x), float64(y), float64(b), float64(h))
            dc.Fill()
        }
    }
}

func main() {
    dc := gg.NewContext(900, 600)
    pinstripe(dc)
    dc.SavePNG("w_pinstripe.png")
}
- Output:
Image similar to the XPL0 entry.
Icon and Unicon
Icon and Unicon can't access the screen directly, so this pinstripe is produced in a maximal sized window. The maximal dimensions have been empirically reduced to keep the boundary on the screen.
graphics.icn supports graphics
J
   load'viewmat'
   NB. size=. 2{.".wd'qm'          NB. J6
   NB. size=. getscreenwh_jgtk_ '' NB. J7
       size=. 3{".wd'qscreen'      NB. J8
   'rgb'viewmat- (4<.@%~{:size)# ({.size) $&> 1 2 3 4#&.> <0 1
Java
import java.awt.*;
import javax.swing.*;

public class PinstripeDisplay extends JPanel {

    final int bands = 4;

    public PinstripeDisplay() {
        setPreferredSize(new Dimension(900, 600));
    }

    @Override
    public void paintComponent(Graphics g) {
        super.paintComponent(g);
        int h = getHeight();
        for (int b = 1; b <= bands; b++) {
            for (int x = 0, colIndex = 0; x < getWidth(); x += b, colIndex++) {
                g.setColor(colIndex % 2 == 0 ? Color.white : Color.black);
                g.fillRect(x, (b - 1) * (h / bands), x + b, b * (h / bands));
            }
        }
    }

    public static void main(String[] args) {
        SwingUtilities.invokeLater(new Runnable() {
            @Override
            public void run() {
                JFrame f = new JFrame();
                f.setDefaultCloseOperation(JFrame.EXIT_ON_CLOSE);
                f.setTitle("PinstripeDisplay");
                f.add(new PinstripeDisplay(), BorderLayout.CENTER);
                f.pack();
                f.setLocationRelativeTo(null);
                f.setVisible(true);
            }
        });
    }
}
Julia
In the Luxor module, the setline() function sets the line width in pixels, which is convenient for pinstriping.
using Luxor

function drawbars(w, h, sections, dk, lt)
    Drawing(w,h)
    background("white")
    width = 1
    height = h/sections
    for y in 0:height:h-1
        setline(width)
        for x in 0:w/width
            sethue(x % 2 == 0 ? dk: lt)
            line(Point(x*width,y), Point(x*width,y+height), :stroke)
        end
        width += 1
    end
end

drawbars(1920, 1080, 4, "black", "white")
finish()
preview()
Kotlin
// version 1.1.0

import java.awt.*
import javax.swing.*

class ColourPinstripeDisplay(): JPanel() {
    private companion object {
        val palette = arrayOf(Color.white, Color.black)
    }

    private val bands = 4

    init {
        preferredSize = Dimension(900, 600)
    }

    protected override fun paintComponent(g: Graphics) {
        super.paintComponent(g)
        for (b in 1..bands) {
            var colIndex = 0
            val h = height / bands
            for (x in 0 until width step b) {
                g.color = palette[colIndex % palette.size]
                g.fillRect(x, (b - 1) * h, b, h)
                colIndex++
            }
        }
    }
}

fun main(args: Array<String>) {
    SwingUtilities.invokeLater {
        val f = JFrame()
        f.defaultCloseOperation = JFrame.EXIT_ON_CLOSE
        f.title = "PinstripeDisplay"
        f.add(ColourPinstripeDisplay(), BorderLayout.CENTER)
        f.pack()
        f.setLocationRelativeTo(null)
        f.setVisible(true)
    }
}
Lambdatalk
Using HTML+CSS
{def window
 {lambda {:w :h}
  div
  {@ style="position:relative;
            top:0; left:0;
            width::wpx; height::hpx;
            background:#eee;"}}}
-> window

{def rec
 {lambda {:x :y :w :h :c}
  {div
   {@ style="position:absolute;
             top::ypx; left::xpx;
             width::wpx; height::hpx;
             background::c;"}}}}
-> rec

{def row
 {lambda {:w :h :k}
  {S.map {{lambda {:dx :dy :h :i}
                  {rec :i         :dy :dx :h #000}
                  {rec {+ :i :dx} :dy :dx :h #fff}
          } {pow 2 :k} {* :k {/ :w 8}} {/ :h 4}}
         {S.serie 0 {- :w 1} {pow 2 {+ :k 1}}}}}}
-> row

{def WIDTH 512}
-> WIDTH
{def HEIGHT 256}
-> HEIGHT

{{window {WIDTH} {WIDTH}}
 {S.map {row {WIDTH} {HEIGHT}}
  0 1 2 3}}
Output visible in http://lambdaway.free.fr/lambdawalks/?view=color_bar_display
Liberty BASIC
Fills whole screen; use Alt-F4 to close program.
nomainwin

UpperLeftX=1
UpperLeftY=1
WindowWidth=DisplayWidth
WindowHeight=DisplayHeight

graphicbox #gr.gr, -1, -1,  DisplayWidth+4, DisplayHeight+1
open "Pinstripe/Display" for window_popup as #gr
 #gr.gr "down"
 #gr.gr "trapclose [quit]"
 #gr.gr "color black"
 #gr.gr "backcolor black"

for w = 1 to 4
    y1=y2
    y2=y1+DisplayHeight/4
    for x = w to DisplayWidth+4 step w*2
         #gr.gr "place ";x;" ";y1;"; boxfilled ";x+w;" ";y2
    next
next
wait

[quit]
    close #gr
    end
Locomotive Basic
10 MODE 2 ' finest resolution
20 sh=400 ' screen height
30 sw=640 ' screen width
40 INK 0,26 ' white ink for background pen (0)
50 INK 1,0  ' black ink for foreground pen (1)
60 FOR sn=1 TO 4 ' four sections
70 bh=INT (sh/4) ' bar height
80 bb=(4-sn)*bh  ' bar baseline
90 dw=0  ' currently drawn bar width
100 dc=0 ' current drawing colour
110 FOR l=0 TO sw -1 ' pan width for each section
120 PLOT l,bb,dc
130 DRAWR 0,bh-1,dc ' subtract 1 pixel (already plotted)
140 dw=dw+1
150 ' section number corresponds to maximum bar width
160 ' change bar colour, if maximum bar width exceeded
170 IF dw>sn THEN dw=0:dc=dc+1 ' next colour
180 IF dc>1 THEN dc=0
190 NEXT l
200 NEXT sn
Lua
function love.load()
    WIDTH = love.graphics.getWidth()
    ROW_HEIGHT = math.floor(love.graphics.getHeight()/4)
    love.graphics.setBackgroundColor({0,0,0})
    love.graphics.setLineWidth(1)
    love.graphics.setLineStyle("rough")
end

function love.draw()
    for j = 0, 3 do
        for i = 0, WIDTH, (j+1)*2 do
	    love.graphics.setColor({255,255,255})
	    for h = 0, j do
		love.graphics.line(i+h, j*ROW_HEIGHT, i+h, (j+1)*ROW_HEIGHT)
	    end
	end
    end
end
Mathematica/Wolfram Language
color[y_] := {White, Black}[[Mod[y, 2] + 1]];
Graphics[Join[{Thickness[1/408]},
  Flatten[{color[#], Line[{{# - 1/2, 408}, {# - 1/2, 307}}]} & /@
    Range[408]], {Thickness[1/204]},
  Flatten[{color[#], Line[{{2 # - 1, 306}, {2 # - 1, 205}}]} & /@
    Range[204]], {Thickness[1/136]},
  Flatten[{color[#], Line[{{3 # - 3/2, 204}, {3 # - 3/2, 103}}]} & /@
    Range[136]], {Thickness[1/102]},
  Flatten[{color[#], Line[{{4 # - 2, 102}, {4 # - 2, 1}}]} & /@
    Range[102]]], ImageSize -> {408, 408}]
- Output:
See here.
Nim
The code is almost the same as for [Color pinstripe task].
import gintro/[glib, gobject, gtk, gio, cairo]

const
  Width = 420
  Height = 420

const Colors = [[255.0, 255.0, 255.0], [0.0, 0.0, 0.0]]

#---------------------------------------------------------------------------------------------------

proc draw(area: DrawingArea; context: Context) =
  ## Draw the bars.

  const lineHeight = Height div 4

  var y = 0.0
  for lineWidth in [1.0, 2.0, 3.0, 4.0]:
    context.setLineWidth(lineWidth)
    var x = 0.0
    var colorIndex = 0
    while x < Width:
      context.setSource(Colors[colorIndex])
      context.moveTo(x, y)
      context.lineTo(x, y + lineHeight)
      context.stroke()
      colorIndex = 1 - colorIndex
      x += lineWidth
    y += lineHeight

#---------------------------------------------------------------------------------------------------

proc onDraw(area: DrawingArea; context: Context; data: pointer): bool =
  ## Callback to draw/redraw the drawing area contents.

  area.draw(context)
  result = true

#---------------------------------------------------------------------------------------------------

proc activate(app: Application) =
  ## Activate the application.

  let window = app.newApplicationWindow()
  window.setSizeRequest(Width, Height)
  window.setTitle("Color pinstripe")

  # Create the drawing area.
  let area = newDrawingArea()
  window.add(area)

  # Connect the "draw" event to the callback to draw the bars.
  discard area.connect("draw", ondraw, pointer(nil))

  window.showAll()

#———————————————————————————————————————————————————————————————————————————————————————————————————

let app = newApplication(Application, "Rosetta.Pinstripe")
discard app.connect("activate", activate)
discard app.run()
Perl
use Imager;

my($xsize,$ysize) = (640,400);
$img = Imager->new(xsize => $xsize, ysize => $ysize);

my $eps = 10**-14;
my $height = int $ysize / 4;
for my $width (1..4) {
    $stripes = int((1-$eps) + $xsize / $width / 2);
    @row = ((0) x $width, (1) x $width) x $stripes;
    for $x (0..$#row) {
        for $y (0..$height) {
            my $offset = $height*($width-1);
            $img->setpixel(x => $x, y => $y+$offset, color => $row[$x] ? 'black' : 'white')
        }
    }
}

$img->write(file => 'pinstripes-bw.png');
Pinstripes (offsite image)
Phix
Just change Colour Pinstripe such that colours = {CD_BLACK, CD_WHITE}
PicoLisp
(let Pbm  # Create PBM of 384 x 288 pixels
   (make
      (for N 4
         (let
            (C 0
               L (make
                  (do (/ 384 N)
                     (do N (link C))
                     (setq C (x| 1 C)) ) ) )
            (do 72 (link L)) ) ) )
   (out '(display)  # Pipe to ImageMagick
      (prinl "P1")
      (prinl (length (car Pbm)) " " (length Pbm))
      (mapc prinl Pbm) ) )
PureBasic
#White = $FFFFFF ;color

;Create a Pinstripe image
Procedure PinstripeDisplay(width, height)
  Protected x, imgID, psHeight = height / 4, psWidth = 1, psTop, horzBand
  imgID = CreateImage(#PB_Any, width, height)
  If imgID
    StartDrawing(ImageOutput(imgID))
      Repeat
        x = 0
        Repeat
          Box(x, psTop, psWidth, psHeight, #White)
          x + 2 * psWidth
        Until x >= width
        psWidth + 1
        horzBand + 1
        psTop = horzBand * height / 4  ;move to the top of next horizontal band of image
      Until psTop >= height
    StopDrawing()
  EndIf
  ProcedureReturn imgID
EndProcedure

;Open a window and display the pinstripe
If OpenWindow(0, 0, 0, 1, 1,"PureBasic Pinstripe", #PB_Window_Maximize | #PB_Window_SystemMenu)
  PicID = PinstripeDisplay(WindowWidth(0), WindowHeight(0))
  ImageGadget(0, 0, 0, WindowWidth(0), WindowHeight(0), ImageID(PicID))
  While WaitWindowEvent() <> #PB_Event_CloseWindow
  Wend
EndIf
Python
#Python task for Pinstripe/Display
#Tested for Python2.7 by Benjamin Curutchet

#Import PIL libraries
from PIL import Image
from PIL import ImageColor
from PIL import ImageDraw

#Create the picture (size parameter 1660x1005 like the example)
x_size = 1650
y_size = 1000
im = Image.new('RGB',(x_size, y_size))

#Create a full black picture
draw = ImageDraw.Draw(im)

#RGB code for the White Color
White  = (255,255,255)

#First loop in order to create four distinct lines
y_delimiter_list = []
for y_delimiter in range(1,y_size,y_size/4):
	y_delimiter_list.append(y_delimiter)


#Four different loops in order to draw columns in white depending on the
#number of the line

for x in range(1,x_size,2):
	for y in range(1,y_delimiter_list[1],1):
		draw.point((x,y),White)

for x in range(1,x_size-1,4):
	for y in range(y_delimiter_list[1],y_delimiter_list[2],1):
		draw.point((x,y),White)
		draw.point((x+1,y),White)

for x in range(1,x_size-2,6):
	for y in range(y_delimiter_list[2],y_delimiter_list[3],1):
		draw.point((x,y),White)
		draw.point((x+1,y),White)
		draw.point((x+2,y),White)

for x in range(1,x_size-3,8):
	for y in range(y_delimiter_list[3],y_size,1):
		draw.point((x,y),White)
		draw.point((x+1,y),White)
		draw.point((x+2,y),White)
		draw.point((x+3,y),White)


#Save the picture under a name as a jpg file.
print "Your picture is saved"
im.save('PictureResult.jpg')
Quackery
Adapted from Colour pinstripe/Display#Quackery.
  [ $ "turtleduck.qky" loadfile ] now!

  [ 1280 ]                 is width      (   --> n     )
  [ 720 ]                  is height     (   --> n     )

  [   0   0   0 ]          is black      (   --> n n n )
  [ 255 255 255 ]          is white      (   --> n n n )

  [ [] swap
    ' [ black white ]
    witheach
      [ over times
        [ dip swap tuck
          nested join
          unrot ]
        drop ]
     drop ]                is colours    ( n --> [     )

  [ behead
    dup dip
      [ nested join ] ]    is nextcolour ( [ --> [ [   )

  [ nextcolour colour
     -1 4 turn
    height n->v
    4 n->v v/ 2dup walk
    -v fly
    1 4 turn
    1 n->v fly ]           is stripe     ( [ --> [     )

  [ turtle
    50 frames
    width n->v 2 1 v/ fly
    -1 4 turn
    height n->v 2 1 v/ fly
    -1 4 turn
    4 times
    [ i^ 1+ colours
      width times stripe
      drop
      width n->v -v fly
      -1 4 turn
      height n->v
      4 n->v v/ fly
      1 4 turn ]
1 frames ] is pinstripes ( --> )- Output:

Racket
(As usual with Racket, this code works on all platforms.)
#lang racket/gui

(define-values [W H] (get-display-size #t))

(define parts 4)

(define (paint-pinstripe canvas dc)
  (send dc set-pen "black" 0 'solid)
  (send dc set-brush "black" 'solid)
  (define H* (round (/ H parts)))
  (for ([row parts])
    (define Y (* row H*))
    (for ([X (in-range 0 W (* (add1 row) 2))])
      (send dc draw-rectangle X Y (add1 row) H*))))

(define full-frame%
  (class frame%
    (define/override (on-subwindow-char r e)
      (when (eq? 'escape (send e get-key-code))
        (send this show #f)))
    (super-new
     [label "Pinstripe"] [width W] [height H]
     [style '(no-caption no-resize-border hide-menu-bar no-system-menu)])
    (define c (new canvas% [parent this] [paint-callback paint-pinstripe]))
    (send this show #t)))

(void (new full-frame%))
Raku
(formerly Perl 6)
my ($x,$y) = 1280,720;
my @colors = 0, 1;

spurt "pinstripes.pgm", qq:to/EOH/ orelse .die;
    P5
    # pinstripes.pgm
    $x $y
    1
    EOH

my $img = open "pinstripes.pgm", :a, :bin orelse .die;

my $vzones = $y div 4;
for 1..4 -> $w {
    my $stripes = ceiling $x / $w / +@colors;
    my $line = Buf.new: (flat((@colors Xxx $w) xx $stripes).Array).splice(0,$x); # DH change 2015-12-20
    $img.write: $line for ^$vzones;
}

$img.close;
Ring
# Project : Pinstripe/Display

load "guilib.ring"

paint = null

new qapp
        {
        win1 = new qwidget() {
                  setwindowtitle("Pinstripe/Display")
                  setgeometry(100,100,500,600)
                  label1 = new qlabel(win1) {
                              setgeometry(10,10,400,400)
                              settext("")
                  }
                  new qpushbutton(win1) {
                          setgeometry(150,500,100,30)
                          settext("draw")
                          setclickevent("draw()")
                  }
                  show()
        }
        exec()
        }

func draw
        p1 = new qpicture()
               color = new qcolor() {
               setrgb(0,0,255,255)
        }
        pen = new qpen() {
                 setcolor(color)
                 setwidth(1)
        }
        paint = new qpainter() {
                  begin(p1)
                  setpen(pen)

        xscreen = 100
        yscreen = 100
        color = new qcolor()
        color.setrgb(0,0,0,255)
        mybrush = new qbrush() {setstyle(1) setcolor(color)}
        setbrush(mybrush)
        for x = 0 to xscreen*4-4 step 4
             drawrect(x,yscreen*3/2,2,yscreen/2)
        next
        for x = 0 to xscreen*4-8 step 8
             drawrect(x,yscreen*2/2,4,yscreen/2)
        next
        for x = 0 to xscreen*4-12 step 12
             drawrect(x,yscreen*1/2,6,yscreen/2)
        next
        for x = 0 to xscreen*4-16 step 16
             drawrect(x,yscreen*0/2,8,yscreen/2)
        next

        endpaint()
        }
        label1 { setpicture(p1) show() }
        return
Output:
https://www.dropbox.com/s/kbwb8jq5q90n88b/Pinstripe.jpg?dl=0
Scala
Java Swing Interoperability
import java.awt._

import javax.swing._

object PinstripeDisplay extends App {

  SwingUtilities.invokeLater(() =>
    new JFrame("Pinstripe") {

      class Pinstripe_Display extends JPanel {

        override def paintComponent(g: Graphics): Unit = {
          val bands = 4

          super.paintComponent(g)
          for (b <- 1 to bands) {
            var colIndex = 0
            for (x <- 0 until getWidth by b) {
              g.setColor(if (colIndex % 2 == 0) Color.white
              else Color.black)
              g.fillRect(x, (b - 1) * (getHeight / bands), x + b, b * (getHeight / bands))
              colIndex += 1
            }
          }
        }

        setPreferredSize(new Dimension(900, 600))
      }

      add(new Pinstripe_Display, BorderLayout.CENTER)
      pack()
      setDefaultCloseOperation(WindowConstants.EXIT_ON_CLOSE)
      setLocationRelativeTo(null)
      setVisible(true)
    })

}
Sinclair ZX81 BASIC
Requires at least 2k of RAM. (Why? Because the whole screen is in use: we have no separate video RAM, so the 1k model runs out of memory trying to plot the bottom quarter of the display.)
The ZX81's graphics resolution is only 64x44, so this is quite a blocky pinstripe. It would be 64x48, in fact; but a strip along the bottom of the screen is reserved for system messages and user input and cannot be made available for other purposes (at least not from BASIC).
10 FOR W=1 TO 4
20 FOR I=0 TO 63 STEP 2*W
30 FOR J=1 TO W
40 FOR K=43-11*(W-1) TO 33-11*(W-1) STEP -1
50 PLOT I+J,K
60 NEXT K
70 NEXT J
80 NEXT I
90 NEXT W
- Output:
Screenshot here.
Tcl
package require Tcl 8.5
package require Tk 8.5

wm attributes . -fullscreen 1
pack [canvas .c -highlightthick 0] -fill both -expand 1
set colors {black white}

set dy [expr {[winfo screenheight .c]/4}]
set y 0
foreach dx {1 2 3 4} {
    for {set x 0} {$x < [winfo screenwidth .c]} {incr x $dx} {
	.c create rectangle $x $y [expr {$x+$dx}] [expr {$y+$dy}] \
            -fill [lindex $colors 0] -outline {}
	set colors [list {*}[lrange $colors 1 end] [lindex $colors 0]]
    }
    incr y $dy
}
Wren
import "graphics" for Canvas, Color
import "dome" for Window

class Game {
    static init() {
        Window.title = "Pinstripe"
        __width = 900
        __height = 600
        Canvas.resize(__width, __height)
        Window.resize(__width, __height)
        var colors = [
            Color.hex("FFFFFF"), // white
            Color.hex("000000")  // black
        ]
        pinstripe(colors)
    }

    static pinstripe(colors) {
        var w = __width
        var h = (__height/4).floor
        for (b in 1..4) {
            var x = 0
            var ci = 0
            while (x < w) {
                var y = h * (b - 1)
                Canvas.rectfill(x, y, b, h, colors[ci%2])
                x = x + b
                ci = ci + 1
            }
        }
    }

    static update() {}

    static draw(dt) {}
}
XPL0
include c:\cxpl\codes;          \include 'code' declarations
int X, Y, W, C;
[SetVid($13);                   \320x200x8 graphics
for Y:= 0 to 200-1 do           \for all the scan lines...
    [W:= Y/50 + 1;              \width of stripe = 1, 2, 3, 4
    C:= 0;                      \set color to black so first pixel becomes white
    for X:= 0 to 320-1 do       \for all the pixels on a scan line...
        [if rem(X/W) = 0 then C:= C xor $0F;    \alternate B&W
        Point(X, Y, C);         \set pixel at X,Y to color C
        ];
    ];
X:= ChIn(1);                    \wait for keystroke
SetVid(3);                      \restore normal text display
]
Output: 
Z80 Assembly
This program works on the MSX. It draws the lines by redefining part of the character set. Given the restrictions of the platform, this is actually the best way to do it. If your MSX supports the high resolution mode, and you have it active, the program detects it and fills the whole screen with twice as many lines.
	;;;	Display pinstripes on an MSX, using Z80 assembly.
	;;;	We'll use the monochrome 'text' mode to do it, by changing
	;;;	a few characters in the VDP font. This program will use
	;;;	either low resolution mode (240x192) or high resolution
	;;;	mode (480x192) depending on which is already active.
	;;;	(In MSX-DOS, `MODE 40` and `MODE 80` switch between them.)
	;;;
	;;;	The characters are 6x8, stored row-wise, and the low two
	;;;	bits are ignored. This means that one-pixel alternating
	;;;	pinstripes are created using the following pattern:
onep:	equ	0A8h	; 1 0 1 0 1 0 (0 0)
	;;;	A 2-pixel pattern needs two alternating characters:
twop1:	equ	0CCh	; 1 1 0 0 1 1 (0 0)
twop2:	equ	030h	; 0 0 1 1 0 0 (0 0)
	;;;	3 * 2 = 6, so the 3-pixel pattern fits in one character:
threep:	equ	0E0h	; 1 1 1 0 0 0 (0 0)
	;;;	And we need four characters for the 4-pixel pattern:
fourp1:	equ	0F0h	; 1 1 1 1 0 0 (0 0)
fourp2:	equ	03Ch	; 0 0 1 1 1 1 (0 0)
fourp3:	equ	0Ch	; 0 0 0 0 1 1 (0 0)
fourp4:	equ	0C0h	; 1 1 0 0 0 0 (0 0)
	;;;	-------------------------------------------------------------
bdos:	equ	5	; Use the BDOS routine to wait for a keypress
dirio:	equ	6	; after the drawing is done
	;;;	MSX ROM calls
calslt:	equ	1Ch	; Interslot call
rom:	equ	0FCC0h	; Main ROM slot
initxt:	equ	6Ch	; Initialize text mode
	;;;	RAM location
linlen:	equ	0F3B0h	; Contains line length, if <=40 we're in low res mode
	;;;	VDP data
vreg:	equ	99h	; Port on which the VDP registers are accessed
vdata:	equ	98h	; Port on which the VRAM is accessed
VWRITE:	equ	40h	; Bit 6 in VDP address = enable writing
	;;;	(these are for low-res mode, high-res mode has them doubled)
font:	equ	0800h	; Location of start of font data
qrtr:	equ	240	; Amount of bytes that fill a quarter of the screen
	;;;	-------------------------------------------------------------
	org	100h
	;;;	Redefine characters 0-7 to the eight characters we need
	ld	hl,font		; Get VDP font location
	call	reshl		; Correct for hires mode if necessary
	call	setadr		; Set the VDP to read from that address
	ld	hl,pats		; Pattern data
	ld	c,8		; Write 8 characters
wrpats:	ld	b,8		; 8 lines per character
	ld 	a,(hl)		; Load current pattern byte
wrpat:	out	(vdata),a	; Write it to the VDP,
	djnz	wrpat		; 8 times.
	inc	hl		; Next pattern
	dec	c		; Any patterns left?
	jr	nz,wrpats	; If so, write next pattern
	ld	hl,0		; Set the VDP to write to address 0
	call	setadr		; which is the beginning of the text screen.
	;;;	Figure out how big a quarter of the screen is
	ld	hl,qrtr		; Get value for low resolution,
	call	reshl		; Correct for high res mode if necessary
	push	hl		; Store number on the stack
	;;;	Write the first quarter of the screen: 1-pixel stripes
	;;;	(character 0).
	ld	b,0
	call	qrtrch
	;;;	Write the second quarter of the screen: 2-pixel stripes
	;;;	(characters 1 and 2 alternating).
	pop	hl		; Load size from the stack
	push	hl
	or	a		; Clear carry
	rr	h		; Divide by 2
	rr	l
q2loop:	ld	a,1		; Character 1,
	out	(vdata),a
	inc	a		; and character 2.
	nop			; Slowdown to make sure the VDP can keep up
	nop
	out	(vdata),a
	dec	hl
	ld 	a,h		; HL = 0?
	or	l
	jr	nz,q2loop	; If not, next 2 bytes
	;;;	Write the third quarter of the screen: 3-pixel stripes
	;;;	(character 3)
	ld	b,3
	call	qrtrch
	;;;	Write the fourth quarter of the screen: 4-pixel stripes
	;;;	(characters 4, 5, 6, and 7 alternating)
	pop	hl		; Load size from stack
	or	a		; Divide by 4
	rr	h
	rr	l
	or	a
	rr	h
	rr	l
q4loop:	ld	a,4		; Character 4
	ld	b,a		; 4 characters at a time
q4out:	out	(vdata),a	; Write the character,
	inc	a		; Next character,
	djnz	q4out		; 4 times.
	dec 	hl
	ld	a,h		; Done yet?
	or	l
	jr	nz,q4loop	; If not, next 4 bytes
	;;;	-------------------------------------------------------------
	;;;	We're done, now wait for a keypress.
clear:	ld	c,dirio		; First, wait while a key IS pressed
	ld	e,0FFh 		; (so we don't quit immediately if the user
	call	bdos		; has held the enter key a bit too long)
	and	a
	jr	nz,clear
wait:	ld	c,dirio		; Then, wait while a key is NOT pressed
	ld	e,0FFh
	call	bdos
	and	a
	jr	z,wait
	;;;	Afterwards, use a BIOS routine to reinitialize the screen
	;;;	(this will reload the default font).
	ld	iy,rom		; BIOS call to initialize text mode
	ld	ix,initxt
	jp	calslt
	;;;	-------------------------------------------------------------
	;;;	Subroutine: write character in B to a quarter of the screen
qrtrch:	pop	de		; Return address
	pop	hl		; Load size from the stack
	push	hl
	push	de		; Put return address back
qloop:	ld	a,b		; Write character in B
	out	(vdata),a
	dec	hl		; One fewer byte left
	ld	a,h		; Done yet?
	or	l
	jr	nz,qloop	; If not, next byte
	ret
	;;;	-------------------------------------------------------------
	;;;	Subroutine: double HL if we are in high resolution mode
reshl:	ld	a,(linlen)	; Check which mode we're in
	cp	41		; Higher than 40?
	ret	c		; If not, we're not in hires mode
	add	hl,hl		; We are in hires mode, so double HL
	ret
	;;;	-------------------------------------------------------------
	;;;	Subroutine: set the VDP to write to address HL.
setadr:	di			; No interrupts while we're messing with VDP
	xor	a		; High address bits for MSX-2 VDP are all 0
	out	(vreg),a	; (MSX-1 VDP will just ignore the zeroes)
	ld	a,14|128	; Write to register 14
	out	(vreg),a
	ld	a,l		; Write the low address byte
	out	(vreg),a
	ld	a,h
	or	VWRITE		; High address bits bits (5..0)
	out	(vreg),a	; Write high addr bits and write flag
	ei			; Reenable interrupts
	ret
	;;;	Patterns to replace the first characters with
pats:	db	onep,twop1,twop2,threep
db fourp1,fourp2,fourp3,fourp4- Programming Tasks
- Test card
- 6502 Assembly
- 8086 Assembly
- Action!
- ActionScript
- Ada
- SDLAda
- AutoHotkey
- BBC BASIC
- Befunge
- C
- C sharp
- C++
- Delphi
- SysUtils,StdCtrls
- FreeBASIC
- Gambas
- Go
- Go Graphics
- Icon
- Unicon
- Icon Programming Library
- J
- Java
- Julia
- Kotlin
- Lambdatalk
- Liberty BASIC
- Locomotive Basic
- Lua
- LÖVE
- Mathematica
- Wolfram Language
- Nim
- Gintro
- Perl
- Phix
- PicoLisp
- PureBasic
- Python
- Quackery
- Racket
- Raku
- Ring
- Scala
- Sinclair ZX81 BASIC
- Tcl
- Tk
- Wren
- DOME
- XPL0
- Z80 Assembly
- Blast/Omit
- GUISS/Omit
- Lotus 123 Macro Scripting/Omit
- OOCalc/Omit