
Pinstripe/Display: Difference between revisions
mNo edit summary |
(Added ZX81 BASIC) |
||
Line 793:
(void (new full-frame%))
</lang>
=={{header|Sinclair ZX81 BASIC}}==
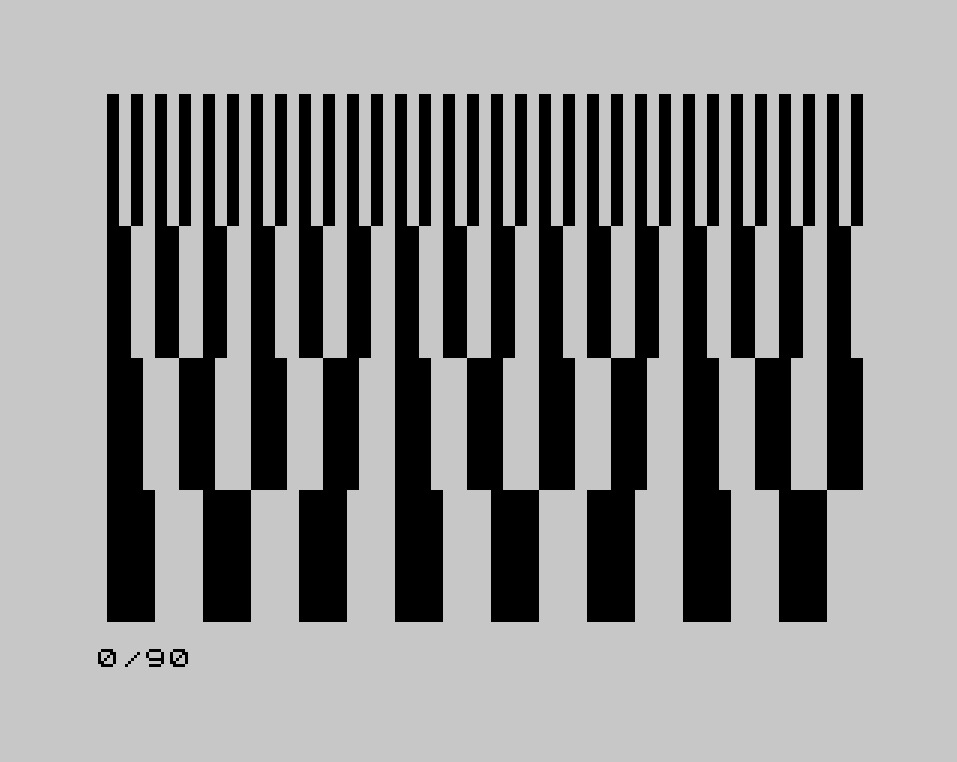
Requires at least 2k of RAM. (Why? Because the whole screen is in use: we have no separate video RAM, so the 1k model runs out of memory trying to plot the bottom quarter of the display.)
The ZX81's graphics resolution is only 64x44, so this is quite a blocky pinstripe. It would be 64x48, in fact; but a strip along the bottom of the screen is reserved for system messages and user input and cannot be made available for other purposes (at least not from BASIC).
<lang basic>10 FOR W=1 TO 4
20 FOR I=0 TO 63 STEP 2*W
30 FOR J=1 TO W
40 FOR K=43-11*(W-1) TO 33-11*(W-1) STEP -1
50 PLOT I+J,K
60 NEXT K
70 NEXT J
80 NEXT I
90 NEXT W</lang>
{{out}}
Screenshot [http://www.edmundgriffiths.com/zx81pinstripe.jpg here].
=={{header|Tcl}}==
| |||
Revision as of 11:03, 17 December 2017

You are encouraged to solve this task according to the task description, using any language you may know.

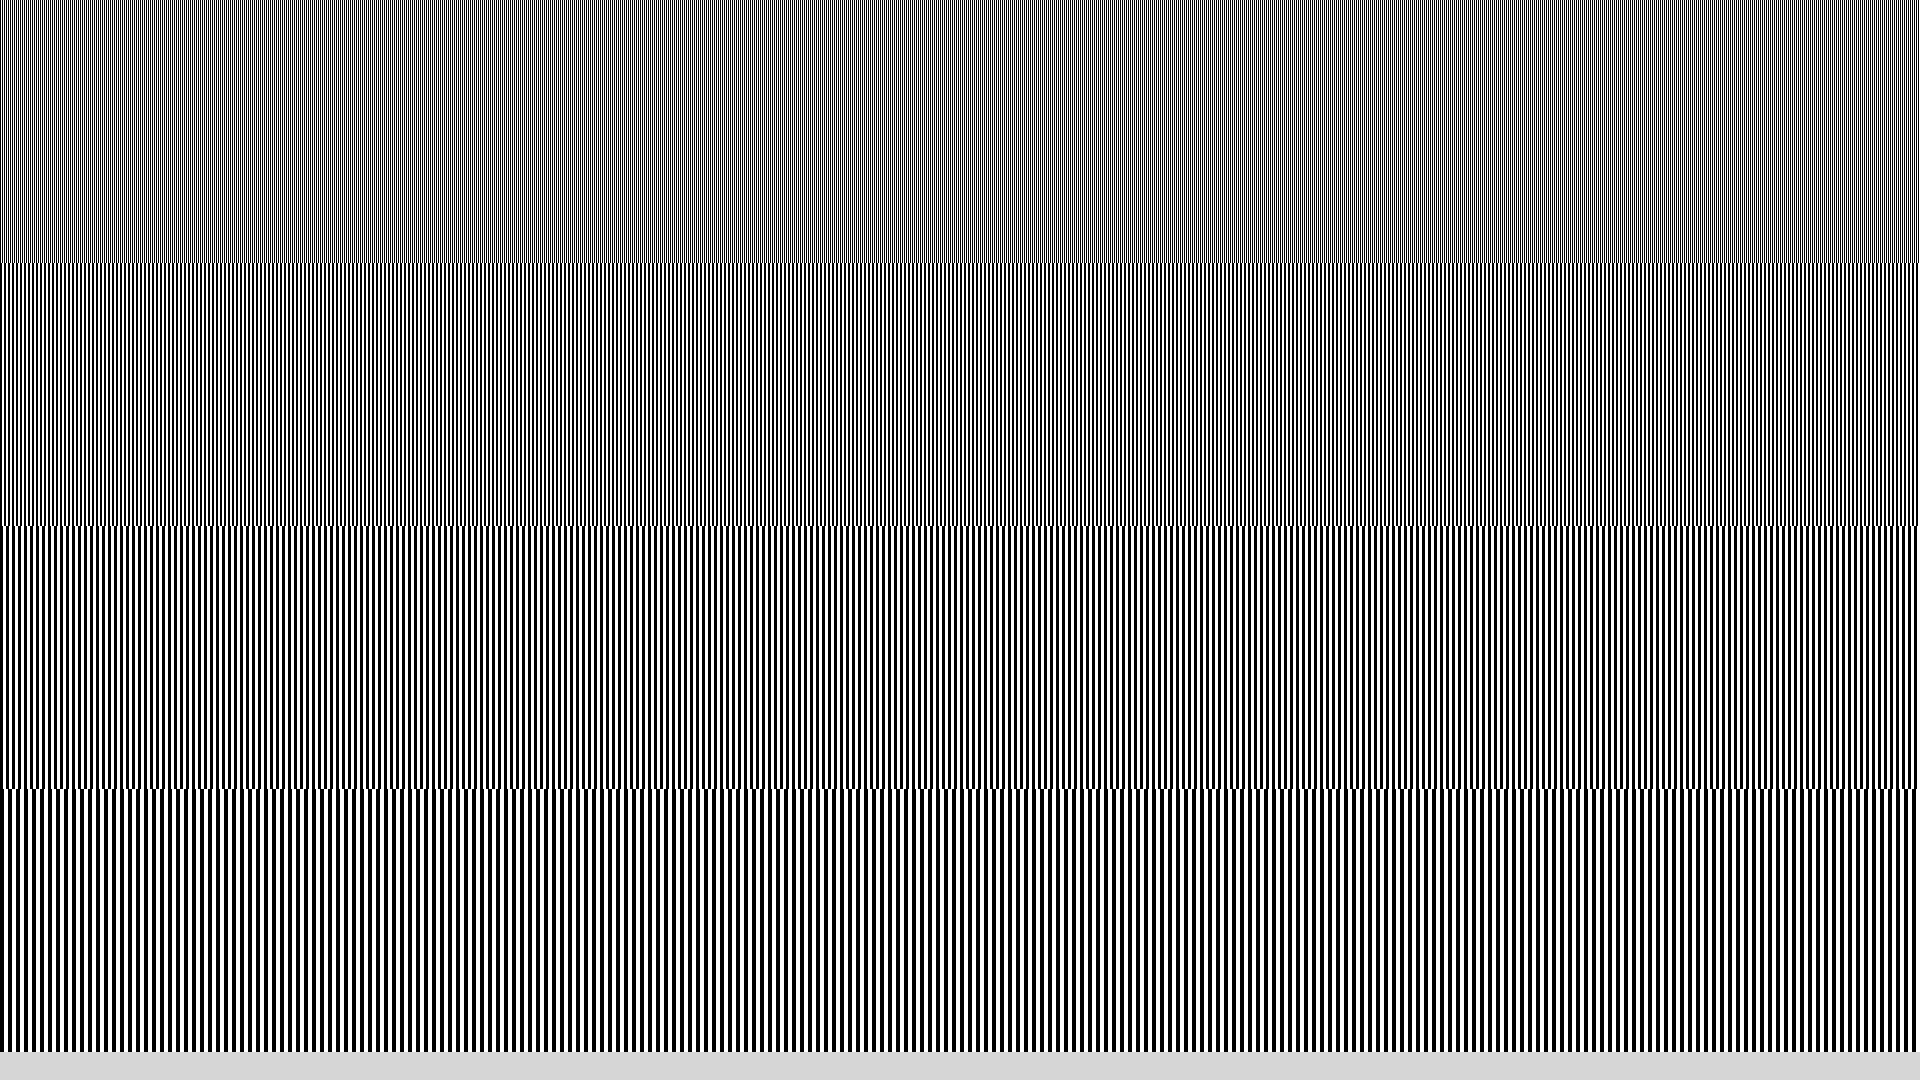
The task is to demonstrate the creation of a series of 1 pixel wide vertical pinstripes across the entire width of the display. The pinstripes should alternate one pixel white, one pixel black.
Quarter of the way down the display, we can switch to a wider 2 pixel wide vertical pinstripe pattern, alternating two pixels white, two pixels black. Half way down the display, we switch to 3 pixels wide, and for the lower quarter of the display we use 4 pixels.
ActionScript
<lang ActionScript3> package {
   import flash.display.Bitmap;
   import flash.display.BitmapData;
   import flash.display.Sprite;
   import flash.events.Event;

   public class Pinstripe extends Sprite {

       public function Pinstripe():void {
           if (stage) init();
           else addEventListener(Event.ADDED_TO_STAGE, init);
       }

       private function init(e:Event = null):void {

           var data:BitmapData = new BitmapData(stage.stageWidth, stage.stageHeight, false, 0xFFFFFFFF);
           data.lock();

           var w:uint = data.width, h:uint = data.height / 4;
           var x:uint, y:uint = 0, i:uint, px:uint, colour:uint, maxy:uint = h;

           for ( i = 1; i <= 4; i++ ) {

               for ( ; y < maxy; y++ ) {
                   colour = 0xFF000000;
                   px = 1;

                   for ( x = 0; x < w; x++ ) {

                       if ( px == i ) {
                           colour = (colour == 0xFF000000) ? 0xFFFFFFFF : 0xFF000000;
                           px = 1;
                       }
                       else px++;

                       data.setPixel32(x, y, colour);

                   }
               }

               maxy += h;

           }

           data.unlock();
           addChild(new Bitmap(data));
       }

   }
} </lang>
AutoHotkey
Requires the GDI+ standard library: http://www.autohotkey.com/forum/viewtopic.php?t=32238
It is worth noting that this fills the whole screen; press Esc to exit.
<lang AHK>h := A_ScreenHeight
w := A_ScreenWidth
pToken := Gdip_Startup()
hdc := CreateCompatibleDC()
hbm := CreateDIBSection(w, h)
obm := SelectObject(hdc, hbm)
G := Gdip_GraphicsFromHDC(hdc)
OnExit, Exit
Gui -Caption +E0x80000 +LastFound +OwnDialogs +Owner +AlwaysOnTop Gui Show, NA hwnd := WinExist()
pBrushB := Gdip_BrushCreateSolid(0xFF000000) pBrushW := Gdip_BrushCreateSolid(0xFFFFFFFF) Loop 4 { n := A_Index Loop % w BorW := A_Index & 1 ? "B" : "W" ,Gdip_FillRectangle(G, pBrush%BorW% , A_Index*n-n, (n-1)*h/4, n, h/4) }
UpdateLayeredWindow(hwnd, hdc, 0, 0, W, H)
Gdip_DeleteBrush(pBrushB) Gdip_DeleteBrush(pBrushW)
SelectObject(hdc, obm) DeleteObject(hbm) DeleteDC(hdc) Gdip_DeleteGraphics(G) Return
Escape:: Exit: Gdip_Shutdown(pToken) ExitApp</lang>
BBC BASIC
<lang bbcbasic> GWL_STYLE = -16
     HWND_TOPMOST = -1
     WS_VISIBLE = &10000000
     WS_CLIPCHILDREN = &2000000
     WS_CLIPSIBLINGS = &4000000
     SYS "GetSystemMetrics", 0 TO xscreen%
     SYS "GetSystemMetrics", 1 TO yscreen%
     SYS "SetWindowLong", @hwnd%, GWL_STYLE, WS_VISIBLE + \
     \                    WS_CLIPCHILDREN + WS_CLIPSIBLINGS
     SYS "SetWindowPos", @hwnd%, HWND_TOPMOST, 0, 0, xscreen%, yscreen%, 0
     VDU 26

     FOR X% = 0 TO xscreen%*4-4 STEP 4
       RECTANGLE FILL X%,yscreen%*3/2,2,yscreen%/2
     NEXT
     FOR X% = 0 TO xscreen%*4-8 STEP 8
       RECTANGLE FILL X%,yscreen%*2/2,4,yscreen%/2
     NEXT
     FOR X% = 0 TO xscreen%*4-12 STEP 12
       RECTANGLE FILL X%,yscreen%*1/2,6,yscreen%/2
     NEXT
     FOR X% = 0 TO xscreen%*4-16 STEP 16
       RECTANGLE FILL X%,yscreen%*0/2,8,yscreen%/2
     NEXT</lang>
C
This code is only a slight variation of my Colour Pinstripe C code. It also uses Borland's Turbo C graphics library.
<lang C> /*Abhishek Ghosh, 6th November 2013, Rotterdam*/
- include<graphics.h>
- include<conio.h>
- define sections 4
int main() { int d=DETECT,m,maxX,maxY,x,y,increment=1; initgraph(&d,&m,"c:/turboc3/bgi");
maxX = getmaxx(); maxY = getmaxy();
for(y=0;y<maxY;y+=maxY/sections) { for(x=0;x<maxX;x+=increment) { setfillstyle(SOLID_FILL,(x/increment)%2==0?BLACK:WHITE); //The only line which differs bar(x,y,x+increment,y+maxY/sections); } increment++; }
getch(); closegraph(); return 0; } </lang>
C++
 <lang cpp>
- include <windows.h>
//-------------------------------------------------------------------------------------------------- class pinstripe { public:
   pinstripe()                        { createColors(); }
   void setDimensions( int x, int y ) { _mw = x; _mh = y; }
   void createColors()
   {
colors[0] = 0; colors[1] = RGB( 255, 255, 255 );
}
   void draw( HDC dc )
   {
       HPEN pen;
int lh = _mh / 4, row, cp; for( int lw = 1; lw < 5; lw++ ) { cp = 0;
row = ( lw - 1 ) * lh;
for( int x = 0 + lw > 1 ? lw > 3 ? 2 : 1 : 0; x < _mw; x += lw ) { pen = CreatePen( PS_SOLID, lw, colors[cp] ); ++cp %= 2;
SelectObject( dc, pen ); MoveToEx( dc, x, row, NULL ); LineTo( dc, x, row + lh ); DeleteObject( pen ); } }
}
private:
   int _mw, _mh;
   DWORD colors[2];
}; //-------------------------------------------------------------------------------------------------- pinstripe pin;
//-------------------------------------------------------------------------------------------------- void PaintWnd( HWND hWnd ) {
   PAINTSTRUCT ps;
   HDC hdc = BeginPaint( hWnd, &ps );
   pin.draw( hdc );
   EndPaint( hWnd, &ps );
} //-------------------------------------------------------------------------------------------------- LRESULT CALLBACK WndProc( HWND hWnd, UINT msg, WPARAM wParam, LPARAM lParam ) {
   switch( msg )
   {
case WM_DESTROY: PostQuitMessage( 0 ); break; case WM_PAINT: PaintWnd( hWnd ); break; default: return DefWindowProc( hWnd, msg, wParam, lParam );
   }
   return 0;
} //-------------------------------------------------------------------------------------------------- HWND InitAll( HINSTANCE hInstance ) {
   WNDCLASSEX wcex;
   ZeroMemory( &wcex, sizeof( wcex ) );
   wcex.cbSize	       = sizeof( WNDCLASSEX );
   wcex.style	       = CS_HREDRAW | CS_VREDRAW;
   wcex.lpfnWndProc   = WndProc;
   wcex.hInstance     = hInstance;
   wcex.hCursor       = LoadCursor( NULL, IDC_ARROW );
   wcex.hbrBackground = ( HBRUSH )( COLOR_WINDOW + 1 );
   wcex.lpszClassName = "_BW_PS_";
   RegisterClassEx( &wcex );
   return CreateWindow( "_BW_PS_", ".: Pinstripe -- PJorente :.", WS_POPUP, CW_USEDEFAULT, 0, 200, 200, NULL, NULL, hInstance, NULL );
} //-------------------------------------------------------------------------------------------------- int APIENTRY _tWinMain( HINSTANCE hInstance, HINSTANCE hPrevInstance, LPTSTR lpCmdLine, int nCmdShow ) {
srand( GetTickCount() );
   HWND hwnd = InitAll( hInstance );
   if( !hwnd ) return -1;
int mw = GetSystemMetrics( SM_CXSCREEN ),
mh = GetSystemMetrics( SM_CYSCREEN );
pin.setDimensions( mw, mh );
RECT rc = { 0, 0, mw, mh };
   AdjustWindowRectEx( &rc, WS_POPUP, FALSE, 0 );
   int w = rc.right  - rc.left,
h = rc.bottom - rc.top;
int posX = ( GetSystemMetrics( SM_CXSCREEN ) >> 1 ) - ( w >> 1 ),
posY = ( GetSystemMetrics( SM_CYSCREEN ) >> 1 ) - ( h >> 1 );
   SetWindowPos( hwnd, HWND_TOP, posX, posY, w, h, SWP_NOZORDER );
   ShowWindow( hwnd, nCmdShow );
   UpdateWindow( hwnd );
   MSG msg;
   ZeroMemory( &msg, sizeof( msg ) );
   while( msg.message != WM_QUIT )
   {
if( PeekMessage( &msg, NULL, 0, 0, PM_REMOVE ) != 0 ) { TranslateMessage( &msg ); DispatchMessage( &msg ); }
   }
   return UnregisterClass( "_BW_PS_", hInstance );
} //-------------------------------------------------------------------------------------------------- </lang>
C#
Using System.Drawing, and writing the output to a file.
<lang csharp> using System.Drawing;
public class Pinstripe {
   static void Main(string[] args)
   {
       var pinstripe = MakePinstripeImage(1366, 768);
       pinstripe.Save("pinstripe.png");
   }
   public static Bitmap MakePinstripeImage(int width, int height)
   {
       var image = new Bitmap(width, height);
       var quarterHeight = height / 4;

       for (var y = 0; y < height; y++)
       {
           var stripeWidth = (y / quarterHeight) + 1;

           for (var x = 0; x < width; x++)
           {
               var color = ((x / stripeWidth) % 2) == 0 ? Color.White : Color.Black;
               image.SetPixel(x, y, color);
           }
       }

       return image;
   }
} </lang>
FreeBASIC
<lang freebasic>' version 14-03-2017 ' compile with: fbc -s console ' or compile with: fbc -s gui
Dim As UInteger ps, col, h, w, x, y1, y2 ScreenInfo w, h
' create display size window, 8bit color (palette), no frame ScreenRes w, h, 8,, 8 ' vga palette black = 0 and white = 15
h = h \ 4 : y2 = h -1
For ps = 1 To 4
   col = 0
   For x = 0 To (w - ps -1) Step ps
       Line (x, y1) - (x + ps -1, y2), col, bf
       col = 15 - col ' col alternate between 0 (black) and 15 (white)
   Next
   y1 += h : y2 += h
Next
' empty keyboard buffer While InKey <> "" : Wend 'Print : Print "hit any key to end program" Sleep End</lang>
Gambas
<lang gambas>'WARNING this takes a time to display 'Use the 'gb.qt4' component
Public Sub Form_Open() Dim iColour As Integer[] = [Color.Black, Color.white] Dim hPanel As Panel Dim siCount, siCounter, siSet As Short
With Me
 .Arrangement = Arrange.Row
 .Border = False
 .Height = Desktop.Height
 .Width = Desktop.Width
 .Fullscreen = True
End With
For siCounter = 1 To 4
 For siCount = 1 To Desktop.Width Step siCounter
   hpanel = New Panel(Me)
   hpanel.Width = siCounter
   hpanel.Height = Desktop.Height / 4
   HPanel.Background = iColour[siSet]
   Inc siSet
   If siSet > 1 Then siSet = 0
 Next
Next
End</lang>
Click here for an image of the output
Icon and Unicon
Icon and Unicon can't access the screen directly, so this pinstripe is produced in a maximal sized window. The maximal dimensions have been empirically reduced to keep the boundary on the screen. <lang Icon>link graphics
procedure main() # pinstripe
  WOpen("canvas=hidden")                   # hide for query
  height := WAttrib("displayheight") - 45  # adjust for ...
  width  := WAttrib("displaywidth") - 20   # ... window 7 borders
  WClose(&window)
  W := WOpen("size="||width||","||height,"bg=black","fg=white") |
       stop("Unable to open window")
  maxbands := 4                             # bands to draw
  bandheight := height / maxbands           # height of each band
  every bands := 1 to maxbands do {         # for each band
        top   := 1 + bandheight * (bands-1) # .. top of band
        step  := 2^bands                    # .. number of steps (width)
        lines := step / 2                   # .. number (width) of stripes
        every c := 1 to width by step & l := 0 to lines-1 do
           DrawLine(c+l,top,c+l,top+bandheight-1)
        }
  WDone(W)                                  # q to exit
end</lang>
graphics.icn supports graphics
J
<lang j> load'viewmat'
  NB. size=. 2{.".wd'qm'          NB. J6
  NB. size=. getscreenwh_jgtk_  NB. J7
      size=. 3{".wd'qscreen'      NB. J8
  'rgb'viewmat- (4<.@%~{:size)# ({.size) $&> 1 2 3 4#&.> <0 1</lang>
Java
<lang java>import java.awt.*; import javax.swing.*;
public class PinstripeDisplay extends JPanel {
final int bands = 4;
   public PinstripeDisplay() {
       setPreferredSize(new Dimension(900, 600));
   }
   @Override
   public void paintComponent(Graphics g) {
       super.paintComponent(g);
       int h = getHeight();
       for (int b = 1; b <= bands; b++) {
           for (int x = 0, colIndex = 0; x < getWidth(); x += b, colIndex++) {
               g.setColor(colIndex % 2 == 0 ? Color.white : Color.black);
               g.fillRect(x, (b - 1) * (h / bands), x + b, b * (h / bands));
           }
       }
   }
   public static void main(String[] args) {
       SwingUtilities.invokeLater(new Runnable() {
           @Override
           public void run() {
               JFrame f = new JFrame();
               f.setDefaultCloseOperation(JFrame.EXIT_ON_CLOSE);
               f.setTitle("PinstripeDisplay");
               f.add(new PinstripeDisplay(), BorderLayout.CENTER);
               f.pack();
               f.setLocationRelativeTo(null);
               f.setVisible(true);
           }
       });
   }
}</lang>
Julia
In the Luxor module, the setline() function sets the line width in pixels, which is convenient for pinstriping. <lang julia> using Luxor
function drawbars(w, h, sections, dk, lt)
   Drawing(w,h)
   background("white")
   width = 1
   height = h/sections
   for y in 0:height:h-1
       setline(width)
       for x in 0:w/width
           sethue(x % 2 == 0 ? dk: lt)
           line(Point(x*width,y), Point(x*width,y+height), :stroke)
       end
       width += 1
   end
end
drawbars(1920, 1080, 4, "black", "white") finish() preview() </lang>
Kotlin
<lang scala>// version 1.1.0
import java.awt.* import javax.swing.*
class ColourPinstripeDisplay(): JPanel() {
   private companion object {
       val palette = arrayOf(Color.white, Color.black)
   }
private val bands = 4
   init {
       preferredSize = Dimension(900, 600)
   }
   protected override fun paintComponent(g: Graphics) {
       super.paintComponent(g)
       for (b in 1..bands) {
           var colIndex = 0
           val h = height / bands
           for (x in 0 until width step b) {
               g.color = palette[colIndex % palette.size]
               g.fillRect(x, (b - 1) * h, b, h)
               colIndex++
           }
       }
   }
}
fun main(args: Array<String>) {
   SwingUtilities.invokeLater {
       val f = JFrame()
       f.defaultCloseOperation = JFrame.EXIT_ON_CLOSE
       f.title = "PinstripeDisplay"
       f.add(ColourPinstripeDisplay(), BorderLayout.CENTER)
       f.pack()
       f.setLocationRelativeTo(null)
       f.setVisible(true)
   }
}</lang>
Liberty BASIC
Fills whole screen; use Alt-F4 to close program. <lang lb> nomainwin
UpperLeftX=1 UpperLeftY=1 WindowWidth=DisplayWidth WindowHeight=DisplayHeight
graphicbox #gr.gr, -1, -1, DisplayWidth+4, DisplayHeight+1 open "Pinstripe/Display" for window_popup as #gr
#gr.gr "down"
#gr.gr "trapclose [quit]"
#gr.gr "color black"
#gr.gr "backcolor black"
for w = 1 to 4
   y1=y2
   y2=y1+DisplayHeight/4
   for x = w to DisplayWidth+4 step w*2
        #gr.gr "place ";x;" ";y1;"; boxfilled ";x+w;" ";y2
   next
next wait
[quit]
   close #gr
   end
</lang>
Locomotive Basic
<lang locobasic>10 MODE 2 ' finest resolution 20 sh=400 ' screen height 30 sw=640 ' screen width 40 INK 0,26 ' white ink for background pen (0) 50 INK 1,0 ' black ink for foreground pen (1) 60 FOR sn=1 TO 4 ' four sections 70 bh=INT (sh/4) ' bar height 80 bb=(4-sn)*bh ' bar baseline 90 dw=0 ' currently drawn bar width 100 dc=0 ' current drawing colour 110 FOR l=0 TO sw -1 ' pan width for each section 120 PLOT l,bb,dc 130 DRAWR 0,bh-1,dc ' subtract 1 pixel (already plotted) 140 dw=dw+1 150 ' section number corresponds to maximum bar width 160 ' change bar colour, if maximum bar width exceeded 170 IF dw>sn THEN dw=0:dc=dc+1 ' next colour 180 IF dc>1 THEN dc=0 190 NEXT l 200 NEXT sn</lang>
Lua
<lang lua> function love.load()
   WIDTH = love.window.getWidth()
   ROW_HEIGHT = math.floor(love.window.getHeight()/4)
   love.graphics.setBackgroundColor({0,0,0})
   love.graphics.setLineWidth(1)
   love.graphics.setLineStyle("rough")
end
function love.draw()
   for j = 0, 3 do
       for i = 0, WIDTH, (j+1)*2 do
love.graphics.setColor({255,255,255}) for h = 0, j do love.graphics.line(i+h, j*ROW_HEIGHT, i+h, (j+1)*ROW_HEIGHT) end end
end
end </lang>
Mathematica
<lang Mathematica>color[y_] := {White, Black}[[Mod[y, 2] + 1]]; Graphics[Join[{Thickness[1/408]},
 Flatten[{color[#], Line[{{# - 1/2, 408}, {# - 1/2, 307}}]} & /@
   Range[408]], {Thickness[1/204]},
 Flatten[{color[#], Line[[[:Template:2]]]} & /@
   Range[204]], {Thickness[1/136]},
 Flatten[{color[#], Line[[[:Template:3]]]} & /@
   Range[136]], {Thickness[1/102]},
 Flatten[{color[#], Line[[[:Template:4]]]} & /@
   Range[102]]], ImageSize -> {408, 408}]</lang>
- Output:
See here.
Perl 6
<lang perl6>my $HOR = 1280; my $VERT = 720;
my @colors = 0, 1;
spurt "pinstripes.pgm", qq:to/EOH/;
   P5
   # pinstripes.pgm
   $HOR $VERT
   1
   EOH
my $PGM = open "pinstripes.pgm", :a, :bin or die "Can't append to pinstripes.pgm: $!";
my $vzones = $VERT div 4; for 1..4 -> $w {
   my $hzones = ceiling $HOR / $w / +@colors;
   my $line = Buf.new: (flat((@colors Xxx $w) xx $hzones).Array).splice(0,$HOR);
   $PGM.write: $line for ^$vzones;
}
$PGM.close;</lang>
Phix
Just change Colour Pinstripe such that colours = {CD_BLACK, CD_WHITE}
PicoLisp
<lang PicoLisp>(let Pbm # Create PBM of 384 x 288 pixels
  (make
     (for N 4
        (let
           (C 0
              L (make
                 (do (/ 384 N)
                    (do N (link C))
                    (setq C (x| 1 C)) ) ) )
           (do 72 (link L)) ) ) )
  (out '(display)  # Pipe to ImageMagick
     (prinl "P1")
     (prinl (length (car Pbm)) " " (length Pbm))
     (mapc prinl Pbm) ) )</lang>
PureBasic
<lang PureBasic>#White = $FFFFFF ;color
- Create a Pinstripe image
Procedure PinstripeDisplay(width, height)
 Protected x, imgID, psHeight = height / 4, psWidth = 1, psTop, horzBand
 imgID = CreateImage(#PB_Any, width, height)
 If imgID
   StartDrawing(ImageOutput(imgID))
     Repeat
       x = 0
       Repeat
         Box(x, psTop, psWidth, psHeight, #White)
         x + 2 * psWidth
       Until x >= width
       psWidth + 1
       horzBand + 1
       psTop = horzBand * height / 4  ;move to the top of next horizontal band of image
     Until psTop >= height
   StopDrawing()
 EndIf
 ProcedureReturn imgID
EndProcedure
- Open a window and display the pinstripe
If OpenWindow(0, 0, 0, 1, 1,"PureBasic Pinstripe", #PB_Window_Maximize | #PB_Window_SystemMenu)
 PicID = PinstripeDisplay(WindowWidth(0), WindowHeight(0))
 ImageGadget(0, 0, 0, WindowWidth(0), WindowHeight(0), ImageID(PicID))
 While WaitWindowEvent() <> #PB_Event_CloseWindow
 Wend
EndIf</lang>
Python
<lang Python>
- Python task for Pinstripe/Display
- Tested for Python2.7 by Benjamin Curutchet
- Import PIL libraries
from PIL import Image from PIL import ImageColor from PIL import ImageDraw
- Create the picture (size parameter 1660x1005 like the example)
x_size = 1650 y_size = 1000 im = Image.new('RGB',(x_size, y_size))
- Create a full black picture
draw = ImageDraw.Draw(im)
- RGB code for the White Color
White = (255,255,255)
- First loop in order to create four distinct lines
y_delimiter_list = [] for y_delimiter in range(1,y_size,y_size/4): y_delimiter_list.append(y_delimiter)
- Four different loops in order to draw columns in white depending on the
- number of the line
for x in range(1,x_size,2): for y in range(1,y_delimiter_list[1],1): draw.point((x,y),White)
for x in range(1,x_size-1,4): for y in range(y_delimiter_list[1],y_delimiter_list[2],1): draw.point((x,y),White) draw.point((x+1,y),White)
for x in range(1,x_size-2,6): for y in range(y_delimiter_list[2],y_delimiter_list[3],1): draw.point((x,y),White) draw.point((x+1,y),White) draw.point((x+2,y),White)
for x in range(1,x_size-3,8): for y in range(y_delimiter_list[3],y_size,1): draw.point((x,y),White) draw.point((x+1,y),White) draw.point((x+2,y),White) draw.point((x+3,y),White)
- Save the picture under a name as a jpg file.
print "Your picture is saved" im.save('PictureResult.jpg')
</lang>
Racket
(As usual with Racket, this code works on all platforms.) <lang Racket>
- lang racket/gui
(define-values [W H] (get-display-size #t))
(define parts 4)
(define (paint-pinstripe canvas dc)
 (send dc set-pen "black" 0 'solid)
 (send dc set-brush "black" 'solid)
 (define H* (round (/ H parts)))
 (for ([row parts])
   (define Y (* row H*))
   (for ([X (in-range 0 W (* (add1 row) 2))])
     (send dc draw-rectangle X Y (add1 row) H*))))
(define full-frame%
 (class frame%
   (define/override (on-subwindow-char r e)
     (when (eq? 'escape (send e get-key-code))
       (send this show #f)))
   (super-new
    [label "Pinstripe"] [width W] [height H]
    [style '(no-caption no-resize-border hide-menu-bar no-system-menu)])
   (define c (new canvas% [parent this] [paint-callback paint-pinstripe]))
   (send this show #t)))
(void (new full-frame%)) </lang>
Sinclair ZX81 BASIC
Requires at least 2k of RAM. (Why? Because the whole screen is in use: we have no separate video RAM, so the 1k model runs out of memory trying to plot the bottom quarter of the display.)
The ZX81's graphics resolution is only 64x44, so this is quite a blocky pinstripe. It would be 64x48, in fact; but a strip along the bottom of the screen is reserved for system messages and user input and cannot be made available for other purposes (at least not from BASIC). <lang basic>10 FOR W=1 TO 4 20 FOR I=0 TO 63 STEP 2*W 30 FOR J=1 TO W 40 FOR K=43-11*(W-1) TO 33-11*(W-1) STEP -1 50 PLOT I+J,K 60 NEXT K 70 NEXT J 80 NEXT I 90 NEXT W</lang>
- Output:
Screenshot here.
Tcl
<lang tcl>package require Tcl 8.5 package require Tk 8.5
wm attributes . -fullscreen 1 pack [canvas .c -highlightthick 0] -fill both -expand 1 set colors {black white}
set dy [expr {[winfo screenheight .c]/4}] set y 0 foreach dx {1 2 3 4} {
for {set x 0} {$x < [winfo screenwidth .c]} {incr x $dx} {
.c create rectangle $x $y [expr {$x+$dx}] [expr {$y+$dy}] \
-fill [lindex $colors 0] -outline {}
set colors [list {*}[lrange $colors 1 end] [lindex $colors 0]]
   }
   incr y $dy
}</lang>
XPL0
<lang XPL0>include c:\cxpl\codes; \include 'code' declarations int X, Y, W, C; [SetVid($13); \320x200x8 graphics for Y:= 0 to 200-1 do \for all the scan lines...
   [W:= Y/50 + 1;              \width of stripe = 1, 2, 3, 4
   C:= 0;                      \set color to black so first pixel becomes white
   for X:= 0 to 320-1 do       \for all the pixels on a scan line...
       [if rem(X/W) = 0 then C:= C xor $0F;    \alternate B&W
       Point(X, Y, C);         \set pixel at X,Y to color C
       ];
   ];
X:= ChIn(1); \wait for keystroke SetVid(3); \restore normal text display ]</lang>
Output: 
- Programming Tasks
- Test card
- ActionScript
- AutoHotkey
- BBC BASIC
- C
- C++
- C sharp
- FreeBASIC
- Gambas
- Icon
- Unicon
- Icon Programming Library
- J
- Java
- Julia
- Kotlin
- Liberty BASIC
- Locomotive Basic
- Lua
- LÖVE
- Mathematica
- Perl 6
- Phix
- PicoLisp
- PureBasic
- Python
- Racket
- Sinclair ZX81 BASIC
- Tcl
- Tk
- XPL0
- Blast/Omit
- GUISS/Omit
- Lotus 123 Macro Scripting/Omit
- OOCalc/Omit